Tuesday, 10 October 2017

The Spiced Pumpkin - Halloween Cocktails | 1

I took a trip to TKMaxx in September when all the Halloween and Autumn homeware was released in early September and came across the most adorable pumpkin copper mug. This inspired me to create a few Halloween-themed cocktails which I'll be posting throughout October! The first one is very comforting and Autumnal, presented in the gorgeous copper pumpkin mug.

The Spiced Pumpkin - Halloween Cocktails

For this you will need:
300ml Milk
1 shot of Irish cream
1 shot of Triple Sec
1/2 tbsp pumpkin spice
optional - marshmallows to top

1. Warm your milk in the microwave in a microwave-safe mug or jug for 30 seconds at a time, stirring after each until you're happy it's at a good temperature.

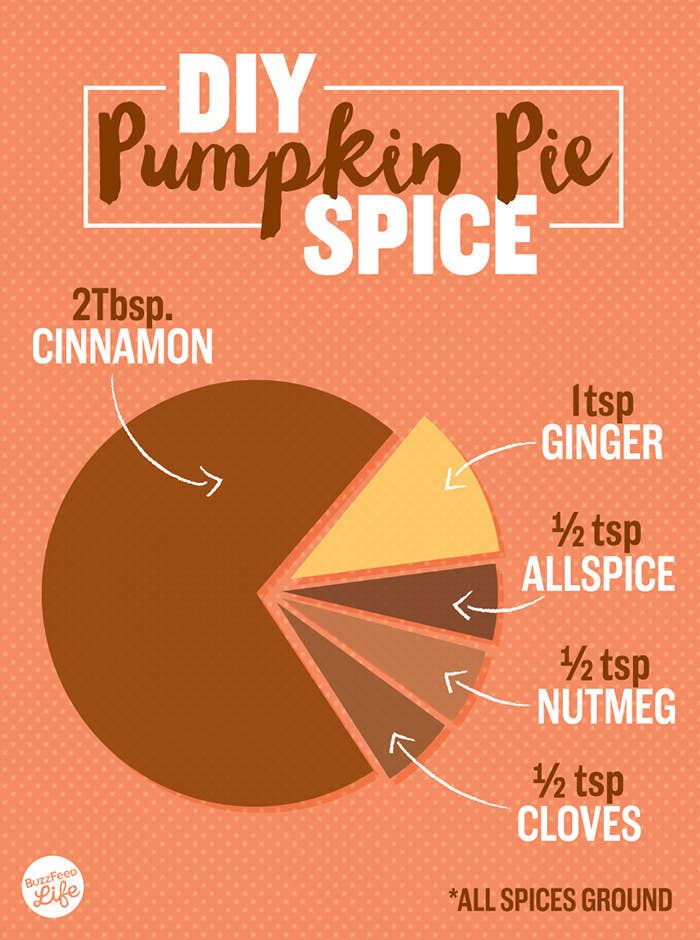
2. Add a shot of Irish Cream and Triple Sec to your cup/mug and sprinkle in your pumpkin spice. If you can't find pumpkin spice simply make your own. I made mine with a recipe from Pinterest.

3. Finally, add your warm milk, mix all together, then decorate with your marshmallows and enjoy.

The Spiced Pumpkin - Halloween Cocktails

This is a very sweet and comforting drink with a subtle orange undertone. It makes a great alternative to hot chocolate and would be a great accompaniment to a night out at the fireworks (just make you're not the designated driver!).

I'd love to know if you try this out and I can't wait to share my other drinks with you! Hope you're excited for Halloween.

PIN ME!

The Spiced Pumpkin - Halloween Cocktails

SHARE:

Saturday, 4 February 2017

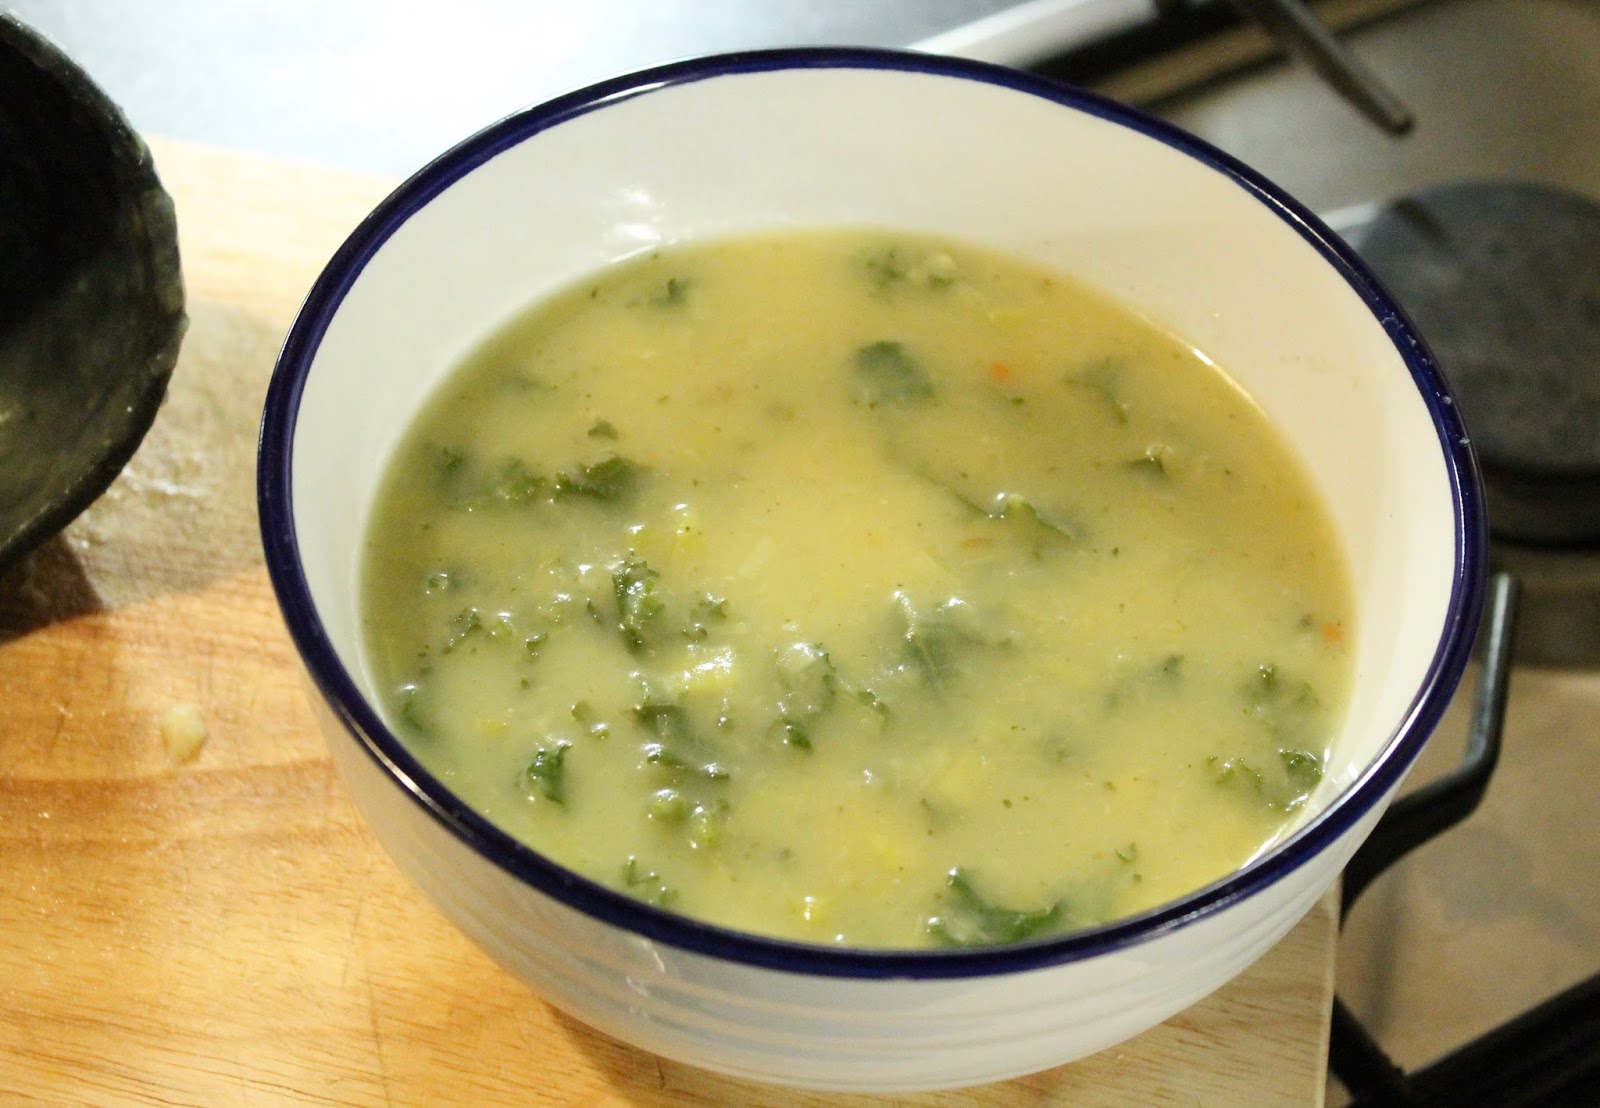
Leek, Potato and Kale Soup recipe

We all need some warming dishes to keep us going through these cold, dark months. Using up some leftover vegetables, I whipped up this delicious soup providing warmth and lots of goodness. Based on this recipe from the BBC food community, I made a soup that I'm sure will become a recipe I make over and over again.


For this recipe you will need:

3 leeks (washed)
4 potatoes (peeled)
1 litre of vegetable stock
3 good handfuls of kale (washed, cut into small pieces with stalks removed)
Splash of milk

First, you will start off washing your leeks, slicing them longways and then cutting them into small slices. Put a pan on the hob with a splash of olive oil, whilst this is warming cut the potato into smallish chunks and add to the pan with the leek.

Cook for 5 minutes stirring intermittently to ensure nothing sticks to the pan or is burnt. Add the stock, stir well and cover for around 10 minutes, or until the potato is soft. When cooked through remove from the heat and liquidise with an immersion blender. Don't fully blend as it's nice to keep a few chunks of potato throughout. Make sure to season with salt and pepper to your taste.

Put your soup back on the heat and add your kale in. First, leave this sit on the top with the lid on to steam through, then stir in after a few minutes. When you're happy the kale has softened, add a splash or two of milk to make it more creamy and then serve.

This soup is certainly a Winter favourite in our house and I'll be making it again soon.

What do you think, will this be on your to try list?
SHARE:

Thursday, 20 October 2016

Trying recipes I found on Pinterest | 2. Easy peasy Pumpkin Pie

Last week you will have seen the first post in my new series (Stuffed Pumpkin Peppers), trying recipes I find on Pinterest. After last week's spooky success, we're back today with another recipe.

Anyone who knows me will know that around this time of year I'm all about Pumpkins. It doesn't matter if it is decorative or edible, I have a certain yearning for anything pumpkin. I'm not sure why maybe it is since I've become a blogger, I just feel the need to have pumpkins in my house. But either way, I'm a little obsessed. I've already got my little munchkins from Aldi to adorn my coffee table and I'm ready to start decorating the house in all my Halloween/Pumpkin decorations brought down from the loft. 

Although I've maxed out on all things Pumpkin visually, I've not really had much experience of them in cooking/baking. There is, of course, the almighty Pumpkin Spice Latte, but as I don't like coffee, I've not had one. So in an effort to introduce more pumpkin into my life, I decided I must try the coveted Pumpkin Pie.

I found this super easy recipe on Pinterest, tracing back to American Heritage Cooking, and started on my mission to find all the ingredients. They were pretty easy to find once I stumbled upon canned pumpkin in Sainsbury's. I was going to do it the old fashioned way and cut up a pumpkin to roast (or steam) but this seemed a lot easier.


easy pumpkin pie recipe UK

easy pumpkin pie recipe UK

If you'd also like to make this pumpkin-spiced dream, then read on and get cooking!

You will need...


1 can of pureed pumpkin 

1 can sweetened condensed milk
2 large eggs, slightly whisked
1 rounded teaspoon ground cinnamon
¼ teaspoon ground cloves
½ teaspoon ground ginger
½ teaspoon ground nutmeg
½ teaspoon salt
1 (9 inch) pie crust (shop-bought or homemade, preferably quite deep!)

Before starting this recipe preheat your oven to 220 degrees. Don't worry, we start high but then drop the temperature down after some time in the oven.


Next whisk all your ingredients together in a bowl, excluding your pie crust (obviously), making sure everything is well combined.


Pour your mixture into your pie crust and bake at 220 degrees for 15 minutes. Make sure to keep a watch to ensure it doesn't burn! When it's had its 15 minutes turn the temperature to 180 degrees and leave for another 35-40 minutes, or until a sharp knife comes out clean from the centre of the pie). If you don't want to put a knife in your pie, you an jiggle your pie. It's done when only the centre 1 inch diameter jiggles.


When your pie has cooled at room temperature, put this in the fridge in a sealed container, or cover with foil to make it last longer. It will also keep for several days at room temperature if you prefer.


easy pumpkin pie recipe UK

easy pumpkin pie recipe UK

The cooking process of this was super easy, although my pie rose really high in the oven, which you can see from the lumpy skin, which I'm not sure if it was supposed to, it came out cooked and ready to eat. 

Now for the taste test! As I don't like cream, I didn't have any with my pie, but I think that's the done thing. It is AMAZING. So spiced and lovely, the perfect thing for a cosy night in. I think I'm going to have a piece with some ice cream. I would say it is quite sickly, so have in small portions.

What do you think, are you going to try your hand at making a pumpkin pie?
SHARE:

Thursday, 13 October 2016

Trying recipes I found on Pinterest | 1. Stuffed Pumpkin Peppers

Quite recently, as you'll have noticed, I haven't put up any blog posts. Life has been flying ahead and nothing has made me want to put fingers to the keys and tap out a post. In an effort to blog more and have more content to share, I've decided to start up a little post every week (hopefully) dedicated to trying recipes I track down from Pinterest. These posts are inspired by the lovely Kat Bouska from MamaKatTV with her weekly video trying drinks she spots on Pinterest. If you haven't already seen any of these videos, then get over there and have a watch. It's everything you wish you could be doing on a Friday night.

Anywho back to why we're here... As it's the month of October, I'm obviously obsessed with Halloween and all things pumpkin. This month I want to try out as many pumpkin-themed recipes as I can, starting with today's! This doesn't actually contain pumpkin, but they look so darn cute, they might as well be pumpkins.

Today's recipe is shredded chicken and rice stuffed peppers, with a Halloween twist! I traced this recipe back to EverydayJenny.com. As with all things you see on Pinterest they usually look a lot better than how they turn out, and that is exactly what has happened with my little beauties. I didn't even get a picture before they went in the oven as I was so confident they look great when they came out. However, I left the oven a little too high and didn't check them. Can we say it adds to their creepy Halloween vibes??

Trying recipes I found on Pinterest - Chicken and Rice Stuffed Pumpkin Peppers - Halloween themed

Trying recipes I found on Pinterest - Chicken and Rice Stuffed Pumpkin Peppers - Halloween themed

So if you still want to make these little cutie pies, read on...

For these stuffed peppers you'll need:
- 4 (preferably) orange peppers
- 2 chicken breasts (although I used chicken thighs)
- 1 teaspoon cumin
- 1 tsp garlic salt
- 1 tsp chilli powder
- 1/2 tsp black pepper
- 1 can diced tomatoes (I added a few spoons of salsa as well)

- 2 cups of rice, I used brown but you can use white (I added some sweetcorn and beans too)
- 1 cup shredded cheddar cheese


To make your spiced shredded chicken add it to the bottom of a slow cooker adding your spices and your tin of tomatoes. Give it all a mix and cook on low for 6-8 hours or high for 4-6 hours. When it is cooked, shred the chicken and allow it to remain in sauce.
To make your peppers, bring a large pot of water to boil.  While you are waiting for the water to boil, wash your peppers, carve out the top, being careful not to break the pepper, and then empty out all the insides including all the white parts. 
Here is where you will carve out your little pumpkin face! Get creative! When you've created your pumpkin face and the water is boiling, put the peppers and tops in and allow to cook for about 5 minutes until peppers are tender. Putting the tops in is important as I found as the colours and size of the peppers change so you have to cook the tops too... even if you won't eat them!
Remove from water and set them on some kitchen roll.  Mix the cooked rice, shredded chicken and any other extras you want to add like beans or sweetcorn. Fill each pepper with the mixture and top with extra cheese. I did a sort of a layered effect, adding a few scoops of the mixture, then cheese and repeat.


Replace the pepper top back on top. Bake at 180 degrees for around 10-20 minutes until cheese is melted and pepper is done to desired tenderness.  Make sure to watch the peppers to make sure they don't crisp up like mine! 
Jenny also suggests that if you want to heat it later that once the peppers are stuffed you can wrap in clingfilm and refrigerate. When you're ready to cook, preheat oven to around 180, remove plastic wrap and bake for 40minutes-1hr.
Trying recipes I found on Pinterest - Chicken and Rice Stuffed Pumpkin Peppers - Halloween themed

Overall I thought this was a lot of work for not much food but they were pretty tasty. Around this time of year, they are perfect to make for kids or if you're having a Halloween-themed dinner party. My tips for this recipe are; make sure to season your chicken well and don't put too much rice in as it will dilute the flavour of your chicken.

Have you tried these before? What did you think??

Do you have any recommendations for recipes to try next?
SHARE:

Tuesday, 6 September 2016

Healthy Winter Warmer - Brown Rice Pudding

I'm a sucker for the cold weather. Forget Summer, I'm all about Autumn and Winter. I love the change in the weather, all the cosy jumpers and warm Autumn colours and of course snuggly nights in watching the dark nights roll in.

When this sort of weather comes around its time to bring out a different set of recipes. Out goes the salads and the picnics and in come the stews and the soups. I'm a huge fan of throwing loads of goodness together and making something delicious and warming.

Recently I've had a hankering for some rice pudding but I wanted an easy recipe that I could make at home. The typical rice pudding uses 'risotto' rice, lots of sugar, full-fat milk and cream which I wasn't really feeling. I wanted something I could make with my cupboard basics and came across this beauty of a recipe.

Healthy Creamy Brown Rice Pudding Recipe

Healthy Creamy Brown Rice Pudding Recipe

Healthy Creamy Brown Rice Pudding Recipe

To make these little pots of joy you will need:
3/4 cup uncooked brown rice
2 cups milk
1/3 cup white sugar
1/4 teaspoon salt
1 egg beaten
1 tablespoon butter
1/2 teaspoon vanilla extract

Boil the brown rice until cooked. When it's done add 1 1/2 cups of the milk, the sugar and salt to the pan and cook over a medium heat until thick and creamy. Stir in the rest of the milk and the beaten egg, cook for a minute longer continuously stirring. Take off the heat and stir in the butter and the vanilla. Portion it up and serve with cinnamon or your topping of choice. Jam would also be perfect!

There you have a lovely winter warmer that isn't as bad for you as normal rice pudding but tastes just as good. Will you be having a go and trying it out for yourself?
SHARE:

Sunday, 10 July 2016

My favourite foodie gals - The Hemsley Sisters

Before Jasmine and Melissa Hemsley burst on to TV this year, I'd really not given them a lot of attention. Yes, I had heard of Hemsley and Hemsley but never had I taken the time to delve in deeper and see what they were about.

I saw an advert for their TV programme a while back and decided to have a watch. It seemed like they would be making some meals that I would find appealing. I watched the first episode and I was hooked. Both Melissa and Jasmine have vibrant and friendly personalities that keep you glued to the TV. It does help that the food they are making looks delicious and is made with all good stuff.

Now I still haven't read into their philosophy about food, but how I see it is that they are making great food with healthy ingredients. They use lots of fruit and vegetables along with meat which can't be bad! As well as mastering savoury dishes they've also tackled dessert, making everyone's favourite with good wholesome ingredients.

Hemsley and Hemsley Cookbook TV review

Hemsley and Hemsley Cookbook TV review

Hemsley and Hemsley Cookbook TV review

After the show, I decided to invest in their two cookbooks, The Art of Eating Well' & 'Good + Simple', so that I could try out their recipes for myself. The sisters' books are filled with lots of great recipes and tonnes of bright inviting images. From the books, I decided to make;

Pablo's Chicken. Involving covering chicken with blitzed almonds and spices to create a pretend KFC. Unfortunately, I wasn't too keen on this as I'm not a fan of chicken on the bone but I do think this coating would be great on a chicken breast. Matt absolutely loved it!

- Chia Pudding. A great breakfast recipe which is dairy-free. Using coconut milk, chia seeds and berries, this little pudding is super healthy.

- Cream of Tomato Soup. A great tomato soup recipe which is easy to make and full of nutrients!
- Courgette and Quinoa Bread. I made this and was excited to try it but in the end, I didn't manage it. It smelt really weird with the quinoa but I do think this would be pretty tasty.

- BB Brownies. Filled with black beans, these brownies looked great and tasted okay. I used coconut oil in these and you could taste it which I wasn't too keen on. Next time I think I'll use butter which is an alternative they specify. I also didn't have enough maple syrup so they weren't as sweet as I would have liked. However, with a layer of Nutella on top, they tasted great. A perfect fudgy texture!

Hemsley and Hemsley Healthy Cookbook food review
Hemsley and Hemsley Cookbook TV review

I love trying recipes that replace naughty, unhealthy ingredients with goodness. I've still got so many recipes marked up ready for me to try out. Even just following their recipes makes me start to think about what I could be creating in the kitchen! All the ingredients needed to make the recipes are either in your fridge/cupboards or easy to get hold of which means creating these recipes at home is easy peasy.

Of all the healthy eating cookbooks I've bought, I would have to say this is my favourite. Melissa and Jasmine know what people like to eat and have given them a way to eat it but also be healthy. I can't wait to see what they come up with next.
SHARE:

Monday, 9 May 2016

Chocolate Strawberry Cupcakes - Strawberry Cream Inspired Recipe

At Christmas-time my favourite sweets are Quality Street's Strawberry cremes. I become obsessed with them stocking up before the big day and then ultimately receiving more from friends and family that I've convinced to buy me some. So in an ode to my love of strawberry cremes I made these cakes hoping to recreate the flavours.

Chocolate Strawberry Cupcakes Recipe - Strawberry Cream Inspired

Chocolate Strawberry Cupcakes Recipe - Strawberry Cream Inspired

Chocolate Strawberry Cupcakes Recipe - Strawberry Cream Inspired

Chocolate Strawberry Cupcakes Recipe - Strawberry Cream Inspired

Chocolate Strawberry Cupcakes Recipe - Strawberry Cream Inspired

Chocolate Strawberry Cupcakes Recipe - Strawberry Cream Inspired

Chocolate Strawberry Cupcakes Recipe - Strawberry Cream Inspired

Chocolate Strawberry Cupcakes Recipe - Strawberry Cream Inspired

Chocolate Strawberry Cupcakes Recipe - Strawberry Cream Inspired

Chocolate Strawberry Cupcakes Recipe - Strawberry Cream Inspired

To make these chocolate strawberry cupcakes here is the method:

Chocolate Cupcake Recipe (makes 18 cupcakes)
150g butter, softened
150g caster sugar
3 medium eggs, beaten
125g self-raising flour
25g cocoa powder
1 tbsp milk

1. Preheat the oven to 190 degrees C and put your cupcake cases on the tray.

2. Put the butter, caster sugar and eggs in a large bowl then sift in the flour and cocoa powder. Whisk together until smooth then transfer to the cupcake cases filling them two thirds full.

3. Bake for about 14-20 minutes making sure to check on them towards the end to make sure they don't burn. When you take them out, put them on a cooling rack before icing.

Strawberry Icing
280g icing sugar
150g butter
4 heaped tsp of seedless jam

To make the strawberry buttercream whisk the butter until soft and pale. Gradually sift in the icing sugar and whisk. When you've mixed all the icing sugar in you can add your jam. Dollop it in and whisk it up. Your icing will go pink and taste of strawberry!

These cakes were super easy to make and tasted so yummy!

Do you think you'll try these?
SHARE:

Monday, 11 April 2016

Lemon Parma Violet Cupcakes

A few weeks ago I was asked if I'd like to try some of the baking range by Betty Crocker. As I've started featuring more recipes on Gingerbread Smiles, I thought it was great timing and agreed knowing it was pot luck what would arrive at my door. When I opened the package I saw that I had received a lemon cake mix and lemon icing. I was a little disappointed as lemon is probably my least favourite of cake flavours, but I got to work thinking of ideas.

I'd recently bought some parma violets on a whim to use in a recipe for the blog and hadn't got round to using them for anything yet. So I decided that the two would go together, and you know what they did and they taste delicious.

Lemon Parma Violet Cupcakes Recipe Sweets

Lemon Parma Violet Cupcakes Recipe Sweets

Lemon Parma Violet Cupcakes Recipe Sweets

Lemon Parma Violet Cupcakes Recipe Sweets

Lemon Parma Violet Cupcakes Recipe Sweets

So to make these little beauties you will need:

- A box of Betty Crocker Lemon Cake Mix
- A tube of Betty Crocker Lemon Icing
- Jar of Lemon Curd
- About 4/5 packs of Parma Violets
- 2 x Icing bags and a nozzle

First, start by making the cakes as per the box instructions. I cooked my cakes for around 20 minutes and they came out a little browned on top but other than that still lovely and moist. When they'd cooled down I got a teaspoon out and used the other end (i.e not the spoon end) to carefully take out the middle of the cake. If you have a cupcake corer you can use this, but I didn't have one at the time so I carved out a small circle in the middle of the top of the cupcake working my way down making sure not to go too far.

Then I filled up my first icing bag with lemon curd and piped this into the little holes I'd just created. Once these were full up with lemon curd, I got the lemon icing from the tub and transferred this to an icing bag. Now depending on how you decided to ice your cakes, you may find the tub doesn't stretch to the number of cakes you have. I know mine didn't although it said it would on the packet. I'd use it sparingly if you don't want to have to buy more, or make some!

Once you've iced your cakes its time for a little Parma Violet decoration. I emptied a packet at a time into a bowl and crushed them with the back of a spoon. Most of them I crushed into dust, but some I left quite a little bit bigger to add to the decoration. Once I'd sprinkled this dust across my cakes I added a full Parma Violet to each cupcake.

And there you have a Lemon Parma Violet Cupcake with a lemon curd filling!

What do you think? Will you be making these?
SHARE:

Tuesday, 5 April 2016

Vanilla Toffee Oreo Freakshake Recipe

Following on from my Chocolate Peanut Butter Freakshake recipe that I posted on Sunday, here is my Vanilla Toffee Oreo Freakshake. This is for those folks who aren't major chocoholics like me but still love a good sickly milkshake. Filled with toffee syrup and Golden Oreo biscuits, this shake is sure to satisfy your sweet tooth.

Vanilla Toffee Oreo Freakshake Recipe Milkshake

Vanilla Toffee Oreo Freakshake Recipe Milkshake

Vanilla Toffee Oreo Freakshake Recipe Milkshake

Vanilla Toffee Oreo Freakshake Recipe Milkshake

Vanilla Toffee Oreo Freakshake Recipe Milkshake

What you'll need:
For the Milkshake:-
- 250ml Milk
- 2 scoops of Vanilla Ice Cream
- 3 Golden Oreos
- A good squeeze of Toffee Syrup

Toppings:-
- Golden Oreos
- Toffee Syrup
- Whipped Cream

A very easy but delicious shake recipe, simply add all the milkshake ingredients to your blender and blitz away. Whilst the blender is doing its thing, drizzle the toffee syrup around the inside of your glass. Pour your milkshake in being careful not to touch the sides. Finish off with a mountain of whipped cream then squeeze toffee syrup all over and break up more biscuits on top.

There you have a very sickly Vanilla Toffee Oreo Freakshake!

Will you be having a go?

Got your own Freakshake recipe? Link below!
SHARE:

Sunday, 3 April 2016

Chocolate Peanut Butter Freakshake Recipe

Today I'm talking Freakshakes. Made famous by a cafe in Australia, they are super-charged milkshakes that are oh so good, but so very bad for you. A deliciously decadent milkshake sits inside a cup drizzled with all sorts of goodies and topped off with a heap of cream and more treats.

I know that a few places in the UK have started to sell these including De Melo in Middlesbrough and GB Cupcakery in Newcastle but I decided it was time to make my own. I decided on two flavours, chocolate peanut butter and vanilla toffee oreo. They are both delicious and filled with too many calories to count. Today's recipe is for the Chocolate Peanut Butter Freakshake...

Chocolate Peanut Butter Freakshake Recipe Milkshake

Chocolate Peanut Butter Freakshake Recipe Milkshake

Chocolate Peanut Butter Freakshake Recipe Milkshake

Chocolate Peanut Butter Freakshake Recipe Milkshake

You will need:

For the milkshake:-
- Vanilla Ice Cream
- 250ml Milk
- Chocolate Spread
- Peanut Butter

Top it off with:-
- Whipped Cream
- Peanut Butter M&Ms
- Chocolate Sprinkles

Add 250ml of milk, two large scoops of ice cream, a good spoonful of peanut butter and two spoons of chocolate spread to a blender and blitz. Whilst this is doing its work, melt some chocolate spread in a microwave and drizzle on the inside on the glass, also smear some around the top of the glass inside and out. Carefully pour your milkshake into the glass making sure not to touch the sides directly.

Shake up your whipped cream can and go to town on the top of your milkshake. Pile it high as the cream will sink as you add your toppings. Finally, add your M&Ms and sprinkles to top it off. And hey presto, you've got your own homemade Freakshake. Make sure to take lots of pictures to make your friends jealous.

Stay tuned for my next Freakshake recipe which will be Vanilla Toffee Oreo.

Will you be making a Freakshake sometime soon?
SHARE:
© this Northerner.

This site uses cookies from Google to deliver its services - Click here for information.

Blogger Template Created by pipdig