Update: I did visit again, to find out what I had on my second visit click here!
Monday 29 July 2013
The Diner, London Restaurant Review
On one of our nights in London we decided to go for tea at a restaurant called The Diner which Mum suggested. This restaurant has a few locations in London but we decided to go to the one just off Carnaby Street located on Ganton Street.
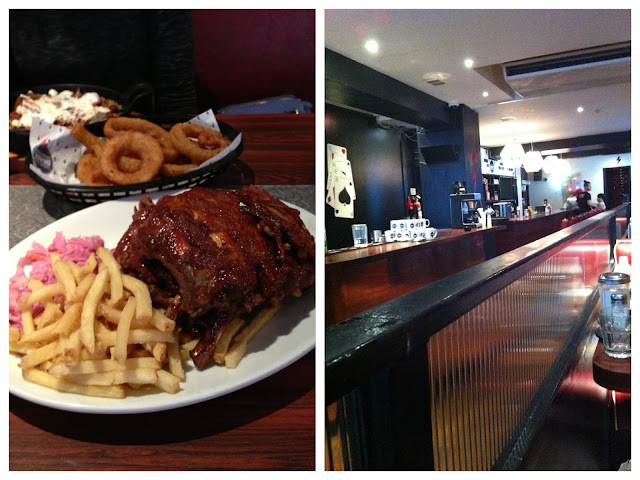
We went in at quite a quiet time as there were only three groups of people inside and a few sat on the outside seating. We were sat in a booth and as soon as we received our menu we got to ordering our food straight away. As I had had burgers all week I thought it was time to get something different, even though the burgers sounded so appetizing! I decided on chilli con carne whilst Mum picked the ribs. We also got a portion of onion rings to share.
The food was lovely but I was so full afterwards! The chilli was very nice, quite spicy but full of chunks of beef. I can't comment on the ribs but I did have some chips which were yummy! Also the onion rings were lush!
I would definitely visit again to see what else they have on offer!
Update: I did visit again, to find out what I had on my second visit click here!
Update: I did visit again, to find out what I had on my second visit click here!
Sunday 28 July 2013
London - The Making of Harry Potter
On a recent visit to London, we got to go to Hogwarts! We had to be at Victoria bus station for 7.30am, which was not the best, but this meant we got there for around 9am and were back in London for around 3pm.


The experience had three parts to it, two buildings and an outside section. I won't spoil it all for you as there is a lot that surprises but here are a few things you will see.
What I will tell you is that you will get to try Butterbeer. My opinion... it is so so sickly, if they were to make it in shops it would be called caramel-ade as it seems to me to be fizzy caramel liquid.
And lest we forget the shop. Lots and lots of Harry Potter related goodies you can get your hands on, including the sweeties from the books/films!
If you are a Harry Potter fan then this is definitely a must. If you are thinking about this and wonder whether it is worth it I would say go for it. It is a half a day out that in which you can see lots of original parts from the film. It will make you look at the films differently!
Let me know if you have been and what you thought!
Meat Liquor, London
Before going to London in February, we had been looking for quirky places to eat and came across a really useful website called The Nudge. I found Meat Liquor and decided it was definitely worth a visit. Having thoroughly enjoyed it the first time I decided to take Mum along when we went to London later in the year.
Meat Liquor is just off Oxford Street behind Debenhams, easy to find if you know its there but hidden enough that it's not too busy. When you walk in it is dark and slightly gothic with graffiti adorning on the walls and lots small tables.
I got the standard cheeseburger, Mum chose the mushroom provolone cheesesteak and we shared a portion of fries. The burger was amazing, so juicy and tasty, filled with lots of cheesy goodness. I'd go as far as saying best burger I've had. Mum really enjoyed her cheesesteak although it was too big to attempt to eat with your hands. It's quite dark in the venue so you have to be careful not to spill anything on you but that's part of the fun.
After visiting I'd recommend this restaurant and am keen to visit the others in the chain. This place definitely won't suit everyone but if you want somewhere quirky to eat this is it.
Meat Liquor is just off Oxford Street behind Debenhams, easy to find if you know its there but hidden enough that it's not too busy. When you walk in it is dark and slightly gothic with graffiti adorning on the walls and lots small tables.
After visiting I'd recommend this restaurant and am keen to visit the others in the chain. This place definitely won't suit everyone but if you want somewhere quirky to eat this is it.
Shake Shack Review in London
This week I went down to London with my Mum for four days and they were quite eventful! Monday we arrived by train and got set up in our hotel. The weather was so humid but we decided to carry on and venture out to Covent Garden. Here we did a bit of shopping and then tried out Shake Shack.
We couldn't seem to find Shake Shack at first but as we wandered the central part of Covent Garden we finally stumbled across it in amongst the other shops. If you are going, don't make the same mistake!
The process of ordering is a bit different, you enter the shop, place your order and then get given a buzzer that will alert you when your food is ready. When it does buzz you then have to pick it up from the window and find a seat. There is inside and 'outside' seating available. Due to the fact it was so hot we thought inside may be cooler.
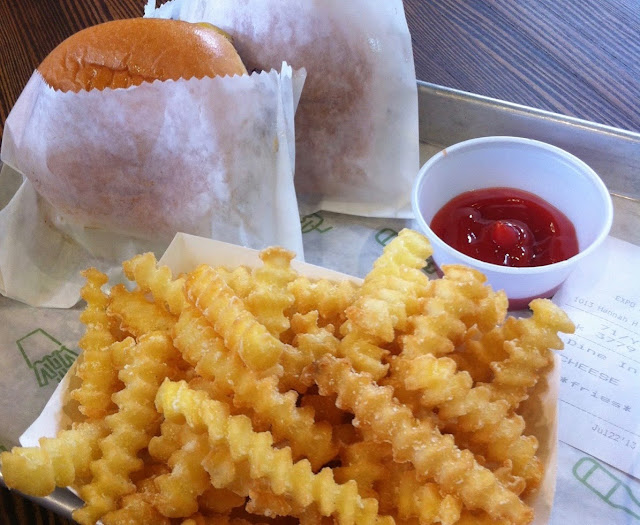
We both ordered 'Cheeseburgers' thinking it would be the Shake Shack Cheeseburger, turns out they have a plain one on the menu too. Here it is with crinkle fries...
If I am honest I wasn't too impressed, the burger was fine as were the chips but I felt there was something missing from the whole experience. To add to this there were too many staff mingling about not really doing much which just makes the place feel cluttered and the whole colour scheme was grey...boring. That is just me being picky though!
If you are hungry for a burger whilst at Covent Garden then check it out and see what you think. There menu is bigger than just plain burgers so you might find something more exciting.
Sunday 21 July 2013
Striping Tape Nail Art Tutorial
After a nosy through my nail box, I came across my striping tape and thought it was about time I perfected the technique. I'd tried to do a striping tape manicure previously but I failed miserably!
This time before I started I decided to do some research and watch a few Youtube videos. I came across a video by SuperWowStyle which worked perfectly. The key to a striping tape manicure is being prepared and taking the tape off a few seconds after applying the top colour coat.
To try this nail art you'll have to get yourself some striping tape (you can get this super cheap from Ebay), your chosen nail polish colours (one for a base coat which you'll see when the tape is taken away and another for the top) and a pair of tweezers (to peel away the tape).
The steps for this manicure are simple:
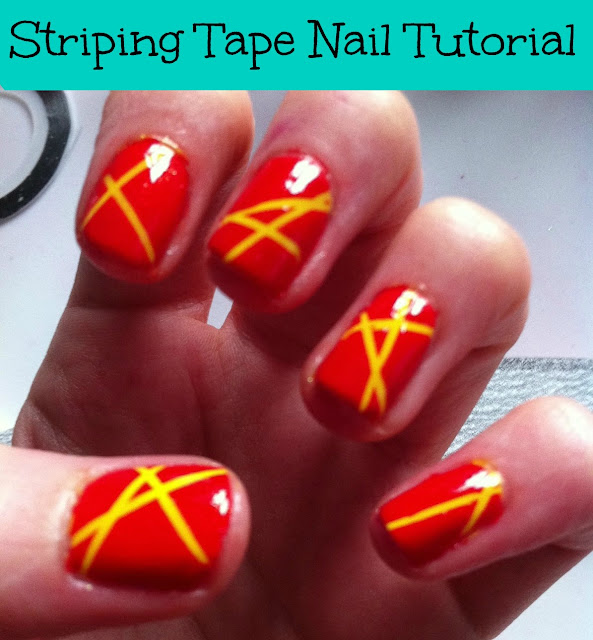
- Apply your base coat as normal and then paint on your base colour. I've used Colour Club - 38.
- Make sure this layer is completely dry before applying anything else. As I am too impatient to let it dry itself I added a coat of Seche Vite to ensure it was fully dry.
- Cut your strips ready to apply. I stuck mine along my table as I would with sticky tape when wrapping a present. You can then apply these with your tweezers. Apply onto the nail in any style you like. Make sure they are stuck down well or else your colour will seep under with enough excess at the end to be able to pull it off.
- Paint your top colour on. I used Avon, 'Apple of His Eye'. Then take your striping tape off with your tweezers. The manicure will work better if you paint one thick coat rather than two as you need to remove the tape after around 10 seconds. If the paint starts to dry you'll mess your whole nail up. Make sure to remember the order in which you stuck down your pieces of tape so you can take them off in reverse, i.e the top one first to prevent smudging the nail varnish.
- When you have completed all nails simply apply your top coat and you're done.
I hope this tutorial helps you out if you are going to attempt this nail art. I'd love to see if you try this out.
How to: Ombre Nail Art Tutorial
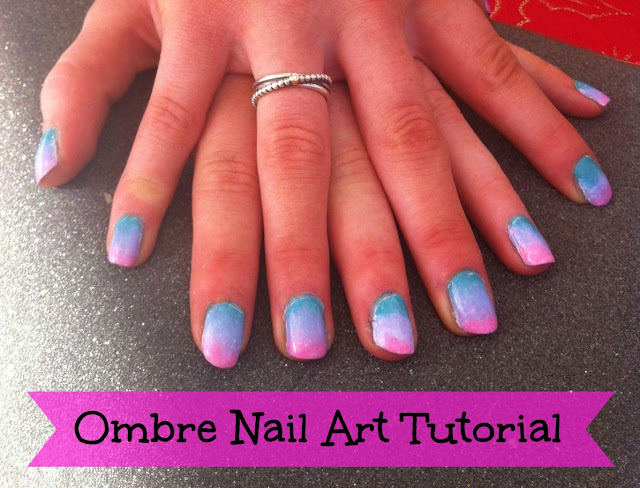
I love to take time to paint my nails but trying out new techniques is not something I often have the chance to do. I don't have much patience, so if I mess up my nails I'm in a terrible mood. I like to do other people's nails and when I asked my sister what nail art she wanted me to try, she asked for multiple colours. I'd seen ombre nails on Instagram so suggested I could try this technique and see how it turned out.
In order to understand how to create the look I used this a Youtube tutorial which was really easy to follow and created the desired look. To help you recreate this nail art look I've written a short tutorial below:
You'll need:
- A white nail varnish (I used OPI Alpine Snow)
- A sponge cut to the size of your nails (makeup or household)
- Three nail varnish colours to be used in your ombre (I used Sinful Colours - Blue - Sweet Nothing, Purple - Candy Coated, Pink - Sugar N Spice)
- First, paint your nails a base coat of white.
- Paint the three nail varnish colours in lines one after the other onto the sponge. Make sure you get enough polish on the sponge so that it will apply nicely.
- Press the sponge on to your nails, you can either roll it on or press, I think a combination of the two works best.
- Then as the sponge will have been slightly bigger than your nails you need to clean up! Do this will some nail varnish remover and a small nail art brush.
What do you think? Fancy trying this out? Let me know if you do!
Subscribe to:
Posts (Atom)
©
this Northerner.
This site uses cookies from Google to deliver its services - Click here for information.


